Well it’s been more than a year since I have touched the
Roomba, and to tell the truth I would have never touched it at all if I hadn’t
been cleaning out the garage to find parts for another project. The last thing I remembered about this is that
I had fixed all the mechanical problems it had and even upgraded the firmware
to allow me to send commands and read sensor data from it. It’s a shame that I had
gone through all of this trouble and it just sat in my garage for over a year
collecting dust. While in the process of cleaning I had spared the Roomba the
fate of my trashcan. I just couldn’t bear to throw it away. I put too much
effort into fixing it. Instead, I merely just set it aside and thought that I
would charge up the batteries and at least get it to clean my floor until I
could find some way of violating its command structure for my own twisted
purposes. About a week after this I finally had an opportunity to hook things
up.
 One of the things I love about the season changing from
bitter cold to moderately cool is the chance to fire up the grill and eat
outside for a change. We had just purchased a new Infra-red grill that I was
dying to cook on. I fired the grill up and allowed it to reach a decent
temperature. While waiting I went into the garage and attempted to hook the
charger up to the Roomba. For some reason the charging light did not come on. I
read the voltage from the charger and verified that the charger was indeed
working. I then popped the Roomba battery out and read the voltage on it. Zero
volts. Great, I just purchased this battery a little over a year ago. I flipped
the battery over and noticed that the label read “Made in China”. Well ok that
explains it then. So now I needed a new battery, but I wanted to be sure that the
Roomba would power up before I dropped twenty-six dollars on a replacement
battery.
  I figured that since the battery was completely dead, it
wouldn’t be of great loss if I opened up the battery case and attempted to wire
together a solution that I could hook up to a power supply for a temporary test
until a new battery arrived.
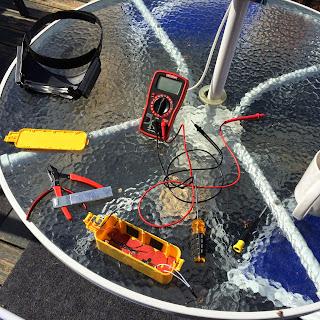
There is really no great mystery here. The battery had three
contacts, which I thought was a bit odd. Two of the contacts were clearly for
power, 14.4 volts I believe. They were even labeled “+” and “-“. The third
contact was on the side and was not labeled. Once I opened the battery case I
noticed that this was a little temperature probe and was used to monitor how
hot the battery was. I removed the batteries and kept everything else wired as
is. I then drilled a hole in an opportune location of the battery case and ran
a set of power wires out of it. This would allow me to supply voltage to the
Roomba from a remote power supply. I dialed up around 15 volts on my power supply, hooked
everything up and pressed the power button. The power indicators lit up and I
was in business. Now I can work unimpeded on interfacing the Roomba.
Part of the allure of hacking the Roomba is that the company
that makes them iRobot had made this so very easy. In fact they even published
a guide on Roomba SCI (Serial Command Interface) communication. In it is a ton
of useful information on getting information to and from the Mini-DIN connector
on the Roomba. Two things immediately stood out to me that would help me
determine what I could use to send commands to the Roomba. First the signal
levels had to be TTL (5 Volt) and second the baud rate had to be either 57.6K
or 19.2K.
I had briefly thought about using my old Commodore Vic-20,
since it supported TTL level serial in and out, and I have had some experience with interfacing it in the past. But I would need some way of
powering it, and to even get the 6522 VIA chip up to 2400 baud would require
some bit banging. I simply was not up to that challenge. Instead I needed
something that was relatively portable, could communicate at one of the two
stated baud rates, and had an on board power supply.
OF COURSE, it was so obvious! Why didn’t I think about this
before? I could use my Tandy 102 portable computer. It had everything I needed.
It could communicate at 19.2K baud, it had a DB25 serial port on the back, it
was small and had its own power supply. As a bonus it even had Microsoft BASIC
on it so I could easily program it. The one limitation it had was that the
Tandy’s serial port used RS-232 level signals for its serial communication. I
could remedy this by using a converter such as a MAX232 IC.
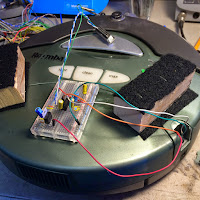
 The circuit for this is pretty simple, first I wanted to
regulate the voltage coming from the Roomba and step it down to 5 volts. From
there it was just a series of filter capacitors and a few capacitors to act as
charge pumps to get the signal levels up to RS-232 standards.
The circuit for this is pretty simple, first I wanted to
regulate the voltage coming from the Roomba and step it down to 5 volts. From
there it was just a series of filter capacitors and a few capacitors to act as
charge pumps to get the signal levels up to RS-232 standards.My first test was simply to hook the Tandy 102 up to the circuit and then communicate with a USB to serial TTL FTDI device. As you can see everything seemed to be working.
So I went ahead and wired everything up. Now I just needed a program on the Tandy 102 to send commands to
the Roomba.
After a little research on the web and reading through the Roomba SCI document I managed to piece together the following BASIC program to exercise some of the more basic functions of the Roomba. Yeah I know its a cheesy program but I really just wanted to get the thing moving.
After a little research on the web and reading through the Roomba SCI document I managed to piece together the following BASIC program to exercise some of the more basic functions of the Roomba. Yeah I know its a cheesy program but I really just wanted to get the thing moving.
10 CLS
20 OPEN "COM:98N1D" FOR OUTPUT AS 130 GOSUB 5000
40 INPUT "GO FORWARD"; N$
50 IF N$ = "Y" THEN GOSUB 1000
60 INPUT "GO BACKWARD"; N$
70 IF N$ = "Y" THEN GOSUB 2000
80 INPUT "SPIN LEFT"; N$
90 IF N$ = "Y" THEN GOSUB 3000
100 INPUT "SPIN RIGHT"; N$
110 IF N$ = "Y" THEN GOSUB 4000
900 END
1000 REM GO FORWARD
1010 PRINT #1, CHR$(137);CHR$(0);CHR$(200);CHR$(128);CHR$(0);
1020 PRINT "MOVING FORWARD"
1030 FOR I = 1 TO 50 : NEXT I
1040 GOSUB 6000
1050 RETURN
2000 REM GO BACKWARD
2010 PRINT #1, CHR$(137);CHR$(255);CHR$(56);CHR$(128);CHR$(0);
2020 PRINT "MOVING BACKWARD"
2030 FOR I = 1 TO 50 : NEXT I
2040 GOSUB 6000
2050 RETURN
3000 REM SPIN LEFT
3010 PRINT #1, CHR$(137);CHR$(0);CHR$(200);CHR$(0);CHR$(1);
3020 PRINT "SPINNING LEFT"
3030 FOR I = 1 TO 50 : NEXT I
3040 GOSUB 6000
3050 RETURN
4000 REM SPIN RIGHT
4010 PRINT #1, CHR$(137);CHR$(0);CHR$(200);CHR$(255);CHR$(255);
4020 PRINT "SPINNING RIGHT"
4030 FOR I = 1 TO 50 : NEXT I
4040 GOSUB 6000
4050 RETURN
5000 REM ENTER ROI
5010 PRINT #1,CHR$(128);CHR$(130);
5020 PRINT "ENTERING ROI"
5030 RETURN
6000 REM STOP MOVING
6010 PRINT #1, CHR$(137);CHR$(0);CHR$(0);CHR$(0);CHR$(0);
6020 PRINT "STOPPING"
6030 RETURN
 Once everything was programmed and pieced together I was anxious for a test. My battery had since come in the mail and all the planets were now aligning.
There is something a little magical I feel in making an old piece of technology talk to a new piece. Perhaps I just want a little piece of the kid in me to be embellished with the fascination I once had with old computers when they were new. This of course is easy to ignite if I hid it behind some ridiculous project, as I have here. I think this will be the extent of my Roomba hack. I suppose at some point in the future I could get this thing under Bluetooth control, but my fascination with the Roomba is coming to an end. I really need to get back to my Speech Synthesizer project and bring that to a close. Below is a small video I put together of everything working. Enjoy!


No comments:
Post a Comment